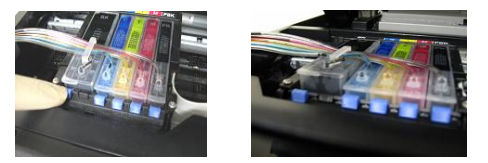
When you get the “Replace Cartridge “ or “Cartridge not recognized” message, follow these steps:
a. Press the OK button on the printer, open the scanner unit cover, and then remove the plastic part from the sensor slot so that the cartridges move into the replacement position.
b. Then push the blue tab to release the cartridges as shown in Figure 1 below and the cartridge will pop up (figure 2 below). You do not need to completely remove the cartridge, once the cartridge pops up you can push it back down until it clicks into place.
c. Then reinsert the plastic part back into the cover sensor slot. The printer will then display the message saying that non-genuine cartridges have been installed and if ask you is you still want to use these cartridges, choose “yes” then press the OK button on the printer and the display panel on the printer should show that the ink is charging. When you get the message that ink charging is complete, reset procedure is done, ink levels on the printers display will reset to full and you can now continue printing.
Note: The reset procedure will only reset the color that was empty so if there is another color that is almost empty, you will soon get the message to replace the cartridge and you will need to do the reset procedure again.
The reset procedure will not reset all colors at one time and you can’t reset the colors until you get the message to “replace” or “not recognized”. Also the function of this printer and CIS model will require the chips to be reset more often than other CIS models.
You May Also Find Interesting -: Epson Resetter – How to Reset Epson Inkjet Cartridges


 November 26th, 2014
  easygroup
 Posted in
  Tags:
Tags: