
 October 20th, 2014
  easygroup
 ![]()
INSTRUCTIONS ON HOW TO REPLACE THE CHIPS
Replacement chips are available for those customers who want to restore the “toner level monitoring” features that the chips have. If you have bought the replacement chip, please follow these simple chip replacement instructions:
1. Remove the old chip by first removing the screw in the top left hand corner of the diagram below
2. If your cartridge has an original chip with TWO holes in it (same as the photo below) and if the chip you have bought only has ONE hole, then you need to follow step (3). If your cartridge does not look like the photo below, then move on to step (4)
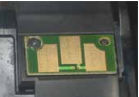
3. You can skip this step if your cartridge does not look like the one in the photo below — Using a flat utility knife or blade, cut the plastic protrusion that is behind the chip on the top right corner. This plastic protrusion sticks through the original QMS 2400 chip but has no purpose. If the replacement chip you purchased does not have a hole for this protrusion to fit into, the protrusion will push on the chip unless you shave away at the protrusion by 1-2 mm. Then the new replacement chip can sit snuggly over the protrusion and not stick out.
4. Replace the new chip by replacing the screw and the new chip in the same orientation Photo of a chip with TWO holes and a protrusion jutting through the right hole. If the new chip you have only has ONE hole on the left, follow step (3) above.
You could also try a workaround to get the cartridge to recognize your old (spent) cartridge, unless you have a new chip installed per above:
Magicolor 2400 Series
STEP 1 -: You need to find the STATUS DISPLAY icon for your QMS 2400
• PROGRAMS •printer. To locate this icon, go to START and then select “STATUS”.•KONICA MINOLTA 2400 UTILITIES
STEP 2 -: In the menu bar on top, select “PRINTER” and then select “MODE SETTING”.
STEP 3 -: Uncheck the “AUTO TONER REPLACE” and then save or click OK if prompted
STEP 4 -: Now turn your printer off, and then turn it back on a few seconds later.
Magicolor 2430 Series
STEP 1 -: On your Magicolor 2430 series printer, make sure the panel display says “READY”. Then press the MENU/SELECT button.
STEP 2 -: By scrolling with the right arrow button, continue until you stop at selection “ENGINE”. Now press the MENU/SELECT button again.
STEP 3 -: Scroll again with the right arrow button until you get to “TONER EMPTY”. Press the MENU/SELECT button again.
STEP 4 -: Press the right arrow button until you get to “TONER IS EMPTY OR OUT”
STEP 5 -: Press MENU/SELECT button once more, and then press the UP arrow until you see “READY”.
You May Also Find Interesting -: What to do if your Cartridges don’t Print as they Should
 Posted in